You can access your Logpoint from the console as an li-admin user in two different ways:
li-admin Commands
li-admin users can use the following commands. You can also view the li-admin commands from the README.txt file in your home folder.
Note
The li-admin account is locked for 15 minutes after three consecutive failed login attempts.
reboot
The reboot command restarts Logpoint.
poweroff
The poweroff command turns off Logpoint.
change-ip
The change-ip command changes the IP address of your Logpoint. You can change the primary interface for multiple interfaces using:
Warning
You must not assign an IP address within the ranges 203.0.113.0/24, 192.0.2.0/24, or 198.51.100.0/24 to your Logpoint. According to the IPv4 standards, the IP addresses are non-routable addresses reserved for documentation purposes. If you use such addresses, Logpoint UI becomes inaccessible.
change-hostname
The change-hostname command changes the hostname of your Logpoint.
change-docker-bip
The change-docker-bip command lets you check network availability of an IP range or update the IP range of the docker bridge in Logpoint. By default, docker bridge uses the IP address range 172.17.0.0/16. If there are devices in your network using the same IP range, there will be a network conflict.
To avoid network conflict, first use change-docker-bip command with --check to check the availability of IP/subnet. If there is a conflict, check another IP range until you find an available IP range. Use the command with --update to change the IP of docker bridge to an available IP range. Allowed prefix range for docker-bip is 1 - 30.
Syntax:
change-docker-bip --check/--update <bridge_ip/prefix>
Example:
To check network availability:
change-docker-bip --check 172.17.0.0/16
To update docker bridge IP:
change-docker-bip --update 172.17.0.1/16
change-date
The change-date command changes the time and date of your Logpoint. Provide the date-time in yyyy-mm-dd hh:mm:ss or yyyy/mm/dd hh:mm:ss format.
start-support
The start-support command enables remote connection for support. Use this command to permit the support team to access your Logpoint. It starts the support connection and keeps the support-port open for the specified amount of time. If the time is not specified, then the support-port is open for 1 hour only.
Syntax:
start-support <timeout in hours(optional)>
Example:
The syntax for start support connection with 1-hour timeout is:
The syntax for start support connection with no timeout is:
stop-support
The stop-support command disables remote connection for support.
Syntax:
repodir
The repodir command lets you add or remove a directory from the repository list.
Syntax:
repodir add <directory_name>

repodir rm <directory_name>
Examples:
repodir add /opt/immune/backup-storage

repodir rm /opt/immune/backup-storage
Make sure you create and mount a ZFS pool and a dataset before adding a new repository directory.
Create ZFS pool.
zpool create -o ashift=12 -O atime=off -O canmount=off -O compression=lz4 -o autoexpand=on <pool name> <block device>
Create ZFS dataset.
zfs create -o xattr=sa -o sync=disabled -o mountpoint=<mount point> <pool name>/<dataset name>
Mount.
zfs mount <pool name>/<dataset name>
Add the new repository directory.
repodir add <repo directory>
ethbonding (LACP)
The ethbonding command either adds a bond to multiple interfaces or removes a bond to get the original interfaces intact. Also, you can execute the ethbonding command to bind the virtual interfaces.
Syntax to add a bond:
ethbonding addbond eth0 eth1
Synatx to remove a bond and get the original interfaces intact:
ethbonding removebond eth0 eth1
Note
The li-admin user has to reboot Logpoint manually for the changes to take effect.
uploadpatch
The uploadpatch command uploads the specified patch. It is recommended that you use the uploadpatch command in case of large sized patch file as this type of file might not be uploaded from GUI due to timeout limits.
Syntax:
uploadpatch <path_to_valid_Logpoint_pak_file>
Example:
uploadpatch LogpointPatch.pak
While uploading a patch using the uploadpatch command:
Upload the patch file in your /tmp directory.
Upload the patch to your Logpoint using the command:
uploadpatch /tmp/Logpoint-7.0.0.pak.
After uploading the patch, delete the patch file from /tmp using the command:
rm -rf /tmp/Logpoint-7.0.0.pak.
Log into the UI, go to Settings >> System Settings >> Updates and click the Install icon in Actions.
route
The route command shows and manipulates the IP routing table.
tcpdump
The tcpdump command analyzes the traffic on a network.
iptables
The iptables command adds or deletes firewall rules in Logpoint to support all the combination of arguments. These configurations are temporary, and last until new configurations are generated.
mount
The mount command attaches the filesystem found on a device to the big file tree.
umount
The umount command detaches or frees the loop device (if any) associated with a mount.
Note
You can mount and unmount the remote Network File System (NFS) and Common Internet File System (CIFS) using the mount and
unmount commands.
pvcreate
The pvcreate command initializes a Physical Volume for later use by the Logical Volume Manager (LVM). A physical volume can be either a disk partition, a whole disk, a meta device, or a loopback file.
Syntax:
pvcreate <physical volume>
Example:
The above example initializes the partition /dev/sdc for later use by the LVM.
Extending Encrypted LVM Volumes in Logpoint
If LVM encryption is enabled during installation, a LUKS-encrypted crypt is created and logical volumes are built inside it. Use the cryptsetup and add-crypttab command to extend logical volumes with the vgextend and lvextend commands.
cryptsetup
The cryptsetup command allows you to manage encryption in storage media. Only LUKS encryption is supported.
Syntax:
cryptsetup <action> <action_args>
Available actions:
luksFormat
luksOpen
luksChangeKey
luksAddKey
status
resize
add-crypttab
The add-crypttab allows you to add an entry for an encrypted partition to the crypttab file to unlock it at boot time.
Syntax:
add-crypttab <device> <mapping>
The encrypted volume can be extended in two ways
Using the space from a separate disk
If space is available on another disk
Create a partition on the disk using fdisk.
Encrypt the partition using cryptsetup: cryptsetup luksFormat <disk location>. Example: cryptsetup luksFormat /dev/sdb1
Unlock the partition: cryptsetup luksOpen <disk location> <mapping name> Example: cryptsetup luksOpen /dev/sdb1 crypt-sdb1
Create a physical volume on the unlocked crypt: pvcreate <physical volume> Example: pvcreate /dev/mapper/crypt-sdb1
Extend the volume group: vgextend <volume group> <physical volumes>. Example: vgextend /dev/LogPoint-vg /dev/mapper/crypt-sdb1
Extend the logical volume with the new available space: lvextend <extension size> <logical volume>. Example: lvextend -l +100%FREE /dev/LogPoint-vg/storage
Extend the filesystem: resize2fs <device> [<size>] Example: resize2fs /dev/LogPoint-vg/storage
Note
To unlock both sda4 and sdb1 with a single passphrase at boot time, run the following command. This will only work if both are locked with the same passphrase.
add-crypttab /dev/sdb1 <mapping_name>
Using space from the same disk
Since LUKS can only encrypt continuous blocks in one crypt, the partition with the available space should be next to the current partition.
Extend the partition to the required space using fdisk.
Extend the crypt to include the newly available space: cryptsetup <action> <action_args> Example: cryptsetup resize /dev/mapper/crypt-sdb1
Extend the physical volume on the unlocked crypt: pvresize <mapping> Example: pvresize /dev/mapper/crypt-sdb1
Extend the logical volume lvextend <extension size> <logical volume>. Example: lvextend -l +100%FREE /dev/LogPoint-vg/storage
vgextend
The vgextend command lets you add initialized physical volumes to an existing volume group to extend the group’s size. It also lets you re-add a physical volume missing due to a transient device failure, without re-initializing it.
Syntax:
vgextend <volume group> <physical volumes>
Example:
vgextend vg01 /dev/sdb /dev/sdc
The above example initializes the existing volume group vg01 with new physical volumes /dev/sdb/ and /dev/sdc.
lvextend
The lvextend command lets you extend the size of a logical volume. You can also extend the snapshots of logical volumes using the command.
Syntax:
lvextend <logical volume> <physical volume>
Example:
lvextend +54 /dev/vg01/lvol01 /dev/sdb3
The above example extends the size of /dev/vg01/lvol01 by 54MB on /dev/sdb3. However, /dev/sdb3 must be a member of the volume group vg01.
resize2fs
The resize2fs command resizes the file system. You can use it to enlarge or shrink an unmounted file system and expand the size of a mounted file system.
Syntax:
resize2fs <device> <size>
Example:
Note
If you don’t specify a size, it defaults to the size of the partition.
zfs
The zfs command configures ZFS datasets within a ZFS storage pool. A dataset is identified by a unique path within the ZFS namespace.
zpool
The zpool command configures ZFS storage pools. A storage pool is a collection of devices that provide physical storage and data replication for ZFS datasets. All datasets within a storage pool share the same space.
gdisk
The gdisk command creates and manipulates the Interactive GUID partition table (GPT). It automatically converts an old-style Master Boot Record (MBR) partition table or BSD disk label stored without an MBR carrier partition to the newer Globally Unique Identifier (GUID) Partition Table (GPT) format, or load a GUID partition table.
sgdisk
The sgdisk command creates and manipulates the Command-line GUID partition table (GPT) manipulator for Linux and Unix.
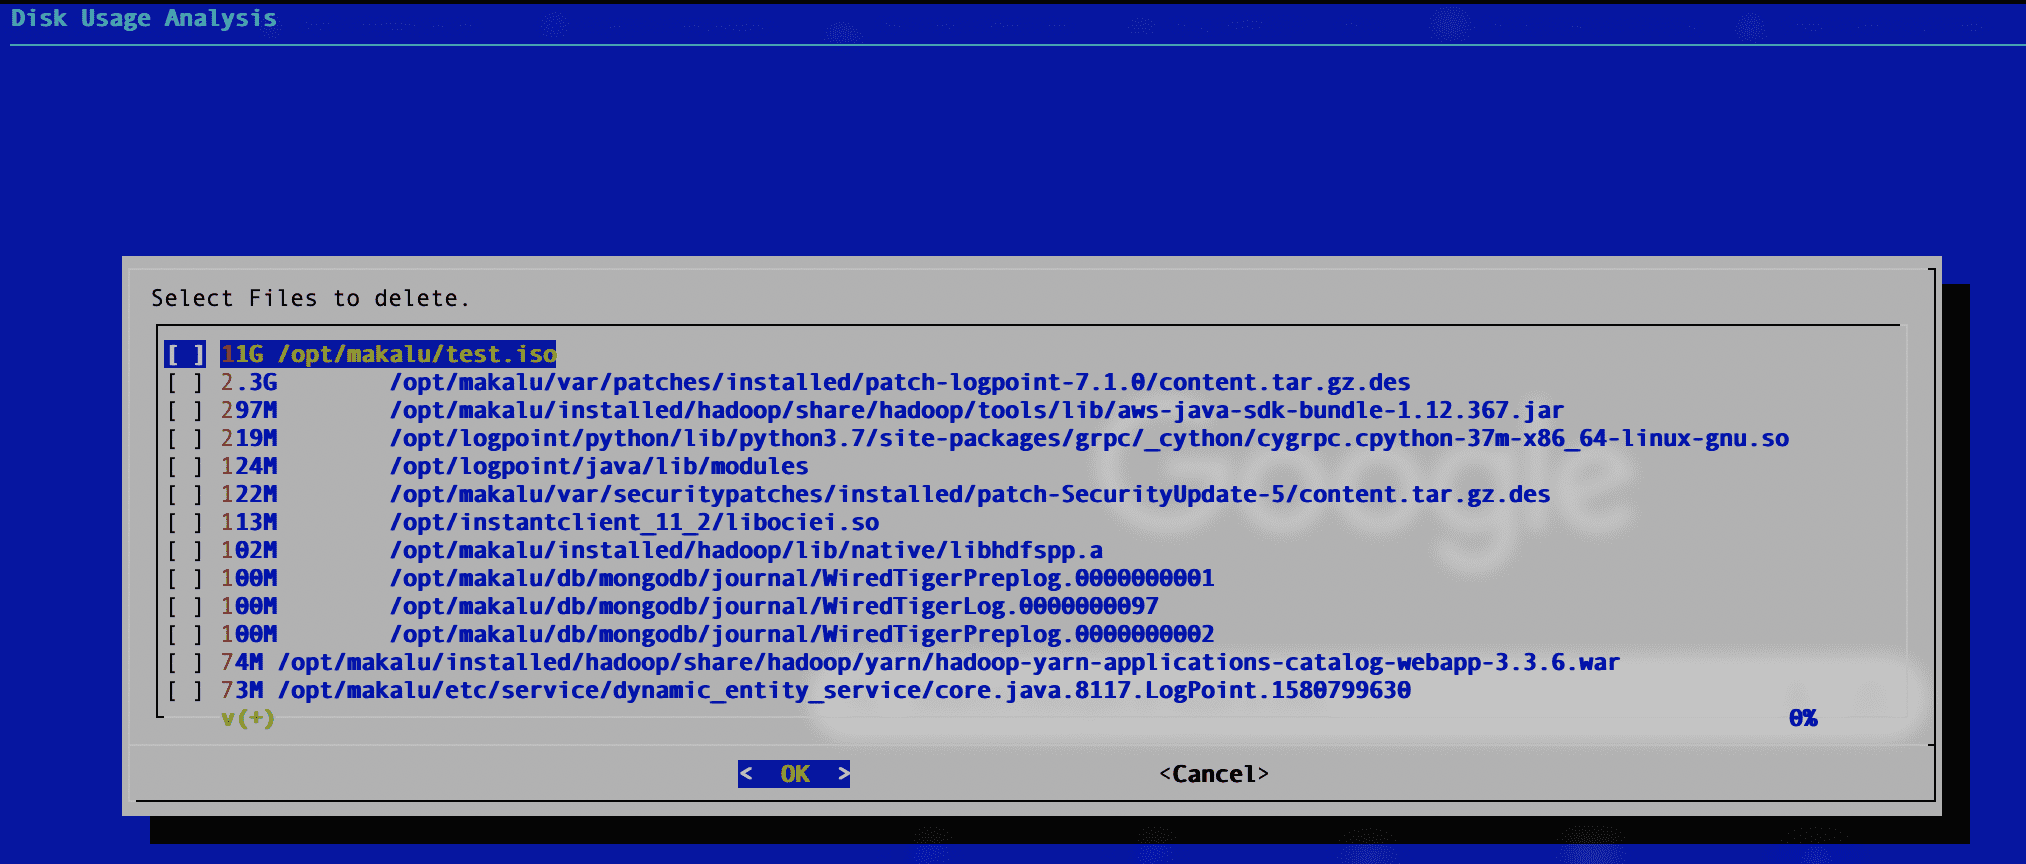
cleanup-opt
The cleanup-opt command lists files in the /opt directory according to size and lets you delete them. You can select multiple files from this list. Use the arrow keys to navigate the list. Press the Spacebar to select files and Enter to delete them. Deleted files are logged in the var/log/i-admin_cleanup-opt.log file.
grub-install
The grub-install command generates a GRUB core image using grub-mkimage and installs it in Logpoint. You must specify the device name on which you want to install GRUB.
Example:
grub-install INSTALL_DEVICE
Note
The device name INSTALL_DEVICE is an OS device name or a GRUB device name.
mds-fs
The mds-fix command enables or disables microarchitectural data sampling (MDS).
Syntax to enable microarchitectural data sampling:
Syntax to disable microarchitectural data sampling:
lpfw-cli
Execute the lpfw-cli command to add and remove firewall ports. The command works with IP addresses, network addresses, and numeric ports but does not support domain names. It uses the iptables and ipsets subcommands to manipulate the firewall.
Note
The lpfw-cli command replaced the addfwports and rmfwports commands.
Syntax to view help texts for lpfw-cli commands:
You can use the lpfw-cli command with the iptables subcommand to:
Add new firewall rules
Remove firewall rules
View firewall rules for all three chains (INPUT, OUTPUT, and FORWARD)
View firewall rules for a particular chain (INPUT, OUTPUT, or FORWARD)
Flush firewall rules
Reload flushed firewall rules
View firewall policies for all three chains (INPUT, OUTPUT, and FORWARD)
View firewall policies for a particular chain (INPUT, OUTPUT, or FORWARD)
You can add new firewall rules to Logpoint using the lpfw-cli iptables add command.
Syntax:
lpfw-cli iptables add <direction>
The <direction> can be in, out, or fwd for INPUT, OUTPUT, or FORWARD respectively.
The list of options and their expected parameters are listed below:
Option |
Expected parameter |
Description |
|---|
-s or –source |
IP address or IP network |
Source IP address |
-d or –destination |
IP address or IP network |
Destination IP address |
-p or –protocol |
tcp or udp |
Indicates the protocol used. Required when –sport or –dport option is used. |
-i or –in-interface |
Network interface name |
Indicates the input interface. Not required when direction is out. |
-o or –out-interface |
Network interface name |
Indicates the output interface. Not required when direction is in. |
-j or –jump |
Either ACCEPT or DROP |
Policy or action to take with the rule. This flag is required. |
-m or –multiport |
None |
Flag used to enable multiport option. When this option is enabled, multiple source or destination ports are supported. |
–sport |
Integer in the range of 0-65535 |
Source port. When this option is enabled, protocol -p is required. |
–dport |
Integer in the range of 0-65535 |
Destination port. When this option is enabled, protocol -p is required. |
Note
The source port (–sport) and destination port (–dport) can be specified multiple times. However, when multiport (m or –multiport) is not enabled, the first port specified using the command is used. If multiport is enabled, you can specify a maximum of 15 ports using one command.
You can remove firewall rules from Logpoint using the lpfw-cli iptables rm command. The options that can be used with this command are identical to the lpfw-cli iptables add command.
Syntax:
Note
You can only remove the rules which have been added using the lpfw-cli command.
You can view the firewall rules for all three chains (INPUT, OUTPUT, and FORWARD) using the lpfw-cli iptables show command.
Syntax:
You can view the firewall rules for a particular chain (INPUT, OUTPUT, or FORWARD) using the lpfw-cli iptables show <chain_type> command.
Syntax:
lpfw-cli iptables show <chain_type>
The <chain_type> can be input, output, or forward for INPUT, OUTPUT, or FORWARD respectively.
You can first set the default firewall policy to ACCEPT for all three chains (INPUT, OUTPUT, and FORWARD) and then flush the firewall rules using the lpfw-cli iptables flush command.
Syntax:
You can reload flushed firewall rules using the lpfw-cli iptables reload command.
Syntax:
You can view the firewall policies (ACCEPT or DROP) for all three chains (INPUT, OUTPUT, and FORWARD) using the lpfw-cli iptables policy command.
Syntax:
You can view the firewall policies (ACCEPT or DROP) for a particular chain (INPUT, OUTPUT, or FORWARD) using the lpfw-cli iptables policy <chain_type> command.
Syntax:
lpfw-cli iptables policy <chain_type>
The <chain_type> can be input, output, or forward for INPUT, OUTPUT, or FORWARD respectively.
The ipset subcommand manages the IP sets. When Logpoint regenerates the firewall configuration it overwrites the changes made using this subcommand. You can use the lpfw-cli command with the ipset subcommand to:
View all the IP sets
View all the IP sets in verbose mode
View information of a particular IP set
Add a new IP to an IP set
Remove an IP from an IP set
Note
An IP set is a collection of IP addresses, network addresses, port addresses, or MAC addresses.
You can view all the IP sets using the lpfw-cli ipset show command.
Syntax:
You can view all the IP sets with their detailed information using the lpfw-cli ipset show -v command.
Syntax:
You can view an IP sets with its detailed information using the lpfw-cli ipset show <ipset_name> command.
Syntax:
lpfw-cli ipset show <ipset_name>
Here <ipset_name> is the name of the IP set whose detailed information you would like to receive.
You can add a new IP address to an IP set using the lpfw-cli ipset add <ipset_name> <ip_address> command.
Syntax:
lpfw-cli ipset add <ipset_name> <ip_address>
Here <ip_address> is the new IP address and <ipset_name> is the name of the IP set where you would like to add the new IP address.
You can remove an IP from an IP set using the lpfw-cli ipset rm <ipset_name> <ip_address> command.
Syntax:
lpfw-cli ipset rm <ipset_name> <ip_address>
Here <ip_address> is the IP address and <ipset_name> is the name of the IP set from where you would like to remove the IP address.
LP Diag Commands
LP Diag is a script that extracts various information from Logpoint. You can add a cron job (scheduled task) that runs periodically to fetch the diagnostic statistics to the machine.
The syntax to view help texts for lpdiag commands is:
The syntax to enable lpdiag cron job is:
lpdiag -e -H <interval_in_hours_between_1-23> -R <retention_period_in_seconds>

lpdiag -e -M <interval_in_minutes_between_1-59> -R <retention_period_in_seconds>

    where,
    H = Frequency in the hour(s) and value must be between 1-23
    M = Frequency in minute(s) and value must be between 1-59
    R = Retention period in second(s). The retention period is the time duration for which the diagnostic information
    is stored in your Logpoint.
Examples:
lpdiag -e -H 10 -R 21600
lpdiag -e -M 30 -R 21600
The syntax to disable lpdiag cron job is:
The syntax to check the status of a cron job is:
ifup
The ifup command brings a network interface up, making it available to transmit and receive data.
ifdown
The ifdown command takes a network interface down, placing it in a state where it cannot transmit or receive data.
change_identifier
The change_identifier command replaces the current identifier of a machine with the new identifier.
Syntax:
change_identifier <old_identifier> <new_identifier>
Example:
The syntax to change the identifier of your Logpoint with old identifier 20fdfa8c505c4bf99a44f025461cd974 and new identifier 20fdfa8c505c4bf99a44f025461cd975 is:
change_identifier 20fdfa8c505c4bf99a44f025461cd974 20fdfa8c505c4bf99a44f025461cd975
Note
The change_identifier command does not work in the Fabric-enabled Logpoints.
move-backup
The move-backup command moves the backup folder from the location /opt/immune to /opt/immune/new_backup if the backup_pool exists, else, it moves the backup folder to /opt/immune/storage.
Syntax:
Note
The newly mounted backup must be named new_backup.
fdisk
The fdisk command displays information about the disk partitions, creates and deletes the disk partitions, and also changes the active partition.
Syntax:
Here, options could be -b sectorsize, -l, -u, -t, -s partition, -v, -C cylinders, -H heads or -S sectors, and device refers to the name of the disk.
Example:
The syntax to specify the number of cylinders on the disk is:
mkfs
The mkfs command creates a filesystem on a formatted storage device.
Syntax:
Here, you must specify the device in the syntax, but adding the options is optional.
Example:
The syntax to create an ext2 filesystem on a formatted floppy disk which is inserted into the first floppy drive is:
rebackup
The rebackup command executes the backup process for the failed backups if the log backup is not successful after Logpoint automatically runs the script for the backup process.
Syntax:
change-syslog-ssl-port
The change-syslog-ssl-port command changes the SSL port of Syslog Collector from 515 to 6514 or vice versa.
Syntax:
change-syslog-ssl-port [port_number]
loadkeys
The loadkeys command loads the kernel keymap for the console.
Syntax:
loadkeys [option] [filename]
Here, you must specify the option in the syntax, but adding the filename is optional.
multipath
The multipath command detects and coalesces multiple paths to devices.
Syntax:
Here, the option could be [-v verbosity], [-b bindings_file], [-d], [-h|-l|-ll|-f|-t|-F|-B|-c|-q|-r|-i|-a|-u|-w|-W], [-p failover|multibus|group_by_serial|group_by_prio|group_by_node_name], [device].
multipathd
The multipathd command checks for failed paths. When this happens, it reconfigures the multipath map the path belongs to, so that the map regains its maximum performance and redundancy.
Syntax:
Here, the options could be [-v verbosity], [-d|-k], [-s], [-B], [-w].
fabric-auth
The fabric-auth command obtains and stores Ticket-Granting Ticket (TGT) which is used for authentication while connecting to the Fabric Storage.
Syntax:
docker
The docker command enables the native docker commands such as start, ps, restart, stop, logs and images.
Syntax:
  docker <start|restart|stop|logs> <container_name/id>
docker <ps|images>
change-ueba-network
The change-ueba-network command changes the network of ueba0 interface used for UEBA.
Syntax:
change-ueba-network <CIDR_Address>
SNMPv3
Simple Network Management Protocol (SNMP) is used to monitor and manage information about network devices, including routers, switches, servers, and printers.
Logpoint supports SNMPv2 and SNMPv3:
Important
When upgrading to Logpoint v7.8.0:
If SNMP configuration is not changed, it will be removed.
If any of the SNMPv3 user parameters (username, password, or key) are changed, those changes will be migrated after the upgrade.
You must manually configure SNMPv3 by creating users and setting their keys and passwords. You can manage SNMPv3 users using li-admin commands.
The add-snmpv3-user command allows you to add SNMP users in Logpoint.
Syntax:
Enter a unique username, password, and key.
The change-snmpv3-passwd command changes the password for SNMPv3 authentication.
Syntax:
The change-snmpv3-key command changes the encryption key of the SNMPv3 user.
Syntax:
The delete-snmpv3-user command allows you to add SNMP users in Logpoint.
Syntax:
Enter the username of the user to delete.
toggle-acct
The toggle-acct command enables or disables the accounting service of Logpoint. The accounting service is disabled by default.
Note
We recommend you to enable the accounting service only for troubleshooting purposes.
Syntax to enable the accounting service:
Syntax to disable the accounting service:
http-options
The http-options command enables or disables the HTTP Options method in your Logpoint. The method is disabled by default.
Note
Make sure you enable the HTTP Options method before sharing resources across multiple domains.
Syntax to enable the HTTP Options method:
Syntax to disable the HTTP Options method:
li-admin-pass-auth
The li-admin-pass-auth command enables or disables password authentication for the li-admin user. The default password is changeme.
Syntax to enable password authentication:
li-admin-pass-auth enable
Syntax to disable password authentication:
li-admin-pass-auth disable
enable-sshusers
You can use enable-sshusers to enable ssh access to all Logpoint users.
Syntax:
disable-sshusers
You can use disable-sshusers to disable ssh access to all Logpoint users. Once you disable ssh access, it can be enabled only from the console.
Syntax:
vlock
You can use vlock to lock one or more users’ virtual console sessions. It allows you to lock your own sessions while other users can still use the same Logpoint via other virtual consoles.
Syntax:
The options can be:
Option |
Description |
|---|
-c or –current |
Locks the current session. It is the default behavior when you run vlock. |
-a or –all |
Locks all users’ console sessions and also disables virtual console switching. |
-n or –new |
Switches to a new virtual console before a user’s console sessions are locked. |
-h or –help |
Displays help message. |
-v or –version |
Displays version number of vlock. |
Note
Enter your password to unlock the session.
netplan-apply
The netplan-apply command is used migrate Logpoint instances to Netplan for network configuration. The command uses YAML configuration files to specify the necessary network settings for Logpoint. The YAML files used for updating or migrating network configuration can be located in any directory within the home directory of the li-admin user.
Make sure the network parameters, their values and indentation in the YAML files are correct. Incorrect parameters can cause network disruptions or complete network outages.
After migrating a Logpoint to Netplan, you can also use the command to update the existing network configuration.
Syntax:
netplan-apply <YAML file>
Example:
netplan-apply network_config.yaml
To learn more, go to netplan migration.
shenandoah
The shenandoah command enables or disables the Shenandoah garbage collector. You can switch between the existing garbage collector and the Shenandoah garbage collector by enabling or disabling it.
Syntax to enable Shenandoah garbage collector:
shenandoah_manager enable
Syntax to disable Shenandoah garbage collector:
shenandoah_manager disable
check integrity
The check_integrity command is used to check the integrity of the logs stored in a repo. It checks the file’s sha512sum value to verify whether any files are changed. The final result will be
stored in /home/li-admin/log_integrity_result.txt file.
Syntax:
check_integrity <repo_path> --filesystem <zfs or ext4> --worker_count <count>
In repo_path, enter the full repo path where the logs are stored.
In filesystem, specify the file system as zfs or ext4. This is optional.
In work_count, specify parallel processing workers. The default is 4 workers.
Example:
check_integrity /opt/immune/storage/logs/_logpoint --filesystem zfs --worker_count 8
Restart Nginx
The restart_nginx command regenerates the configuration for nginx and restarts it.
Syntax: